DataCabinet
DataCabinet enables running computer laboratory for classrooms. It does it using Jupyter notebooks, conda environments and containers. It is powered by a distributed system running on AWS.
Our intent is to provide the building blocks and enough flexibility to be able to create complex programming assignments. They can have data, packages, backend components, autograding etc associated with them. The students or other uses of these assignments can easily open, work and submit assignments for review.
Features:
- Jupyter notebooks with support for python or R on your web browser. Other kernels can be manually installed.
- Isolated Conda environments with their own package dependencies as DataCabinet projects.
- A dedicated disk and a shared disk to easily share projects and environments.
- Integrated with NBGrader assignments with advanced capbilities DataCabinet and NBGrader
- Using git projects with DataCabinet.
- Common Problems
Document sections
Get started
- Register
- Login
- Create Project
- Launch Project
- Creating Notebooks
- Install packages
- Export Project
- Import Project
- Code
Register
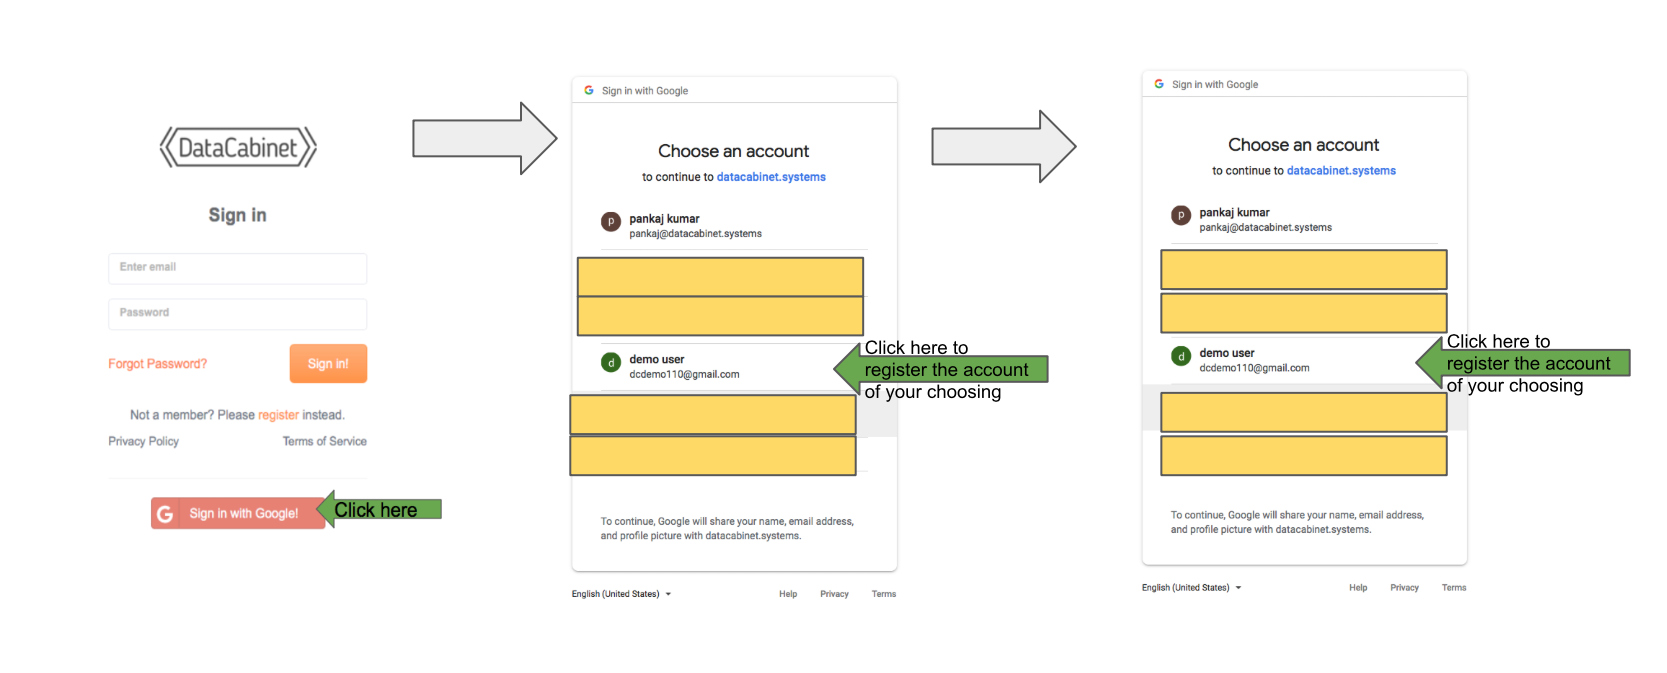
Method 1: Using Google Account
You can register a datacabinet account using your Google account at datacabinet systems. First time you login/register, it will take 5 minutes to provision your account after which you can login using the same method you registered.
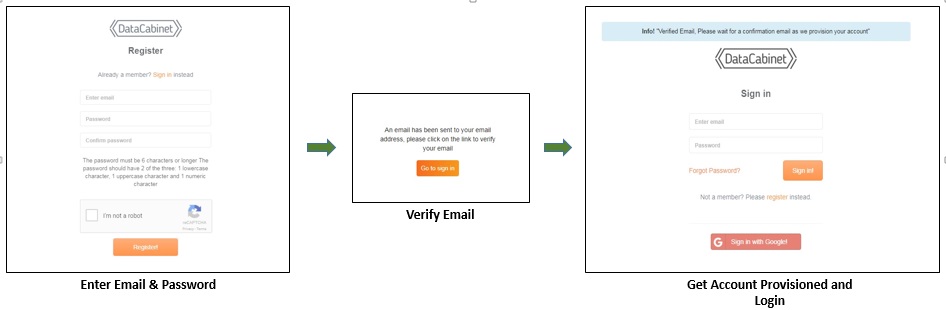
Method 2: Directly on datacabinet
You can register your account at datacabinet systems. After registering, you will be sent an e-mail for verification after which your account would be ready to login.
Log in
Go to datacabinet systems to login. You can either login using your credentials with datacabinet or use your google account.
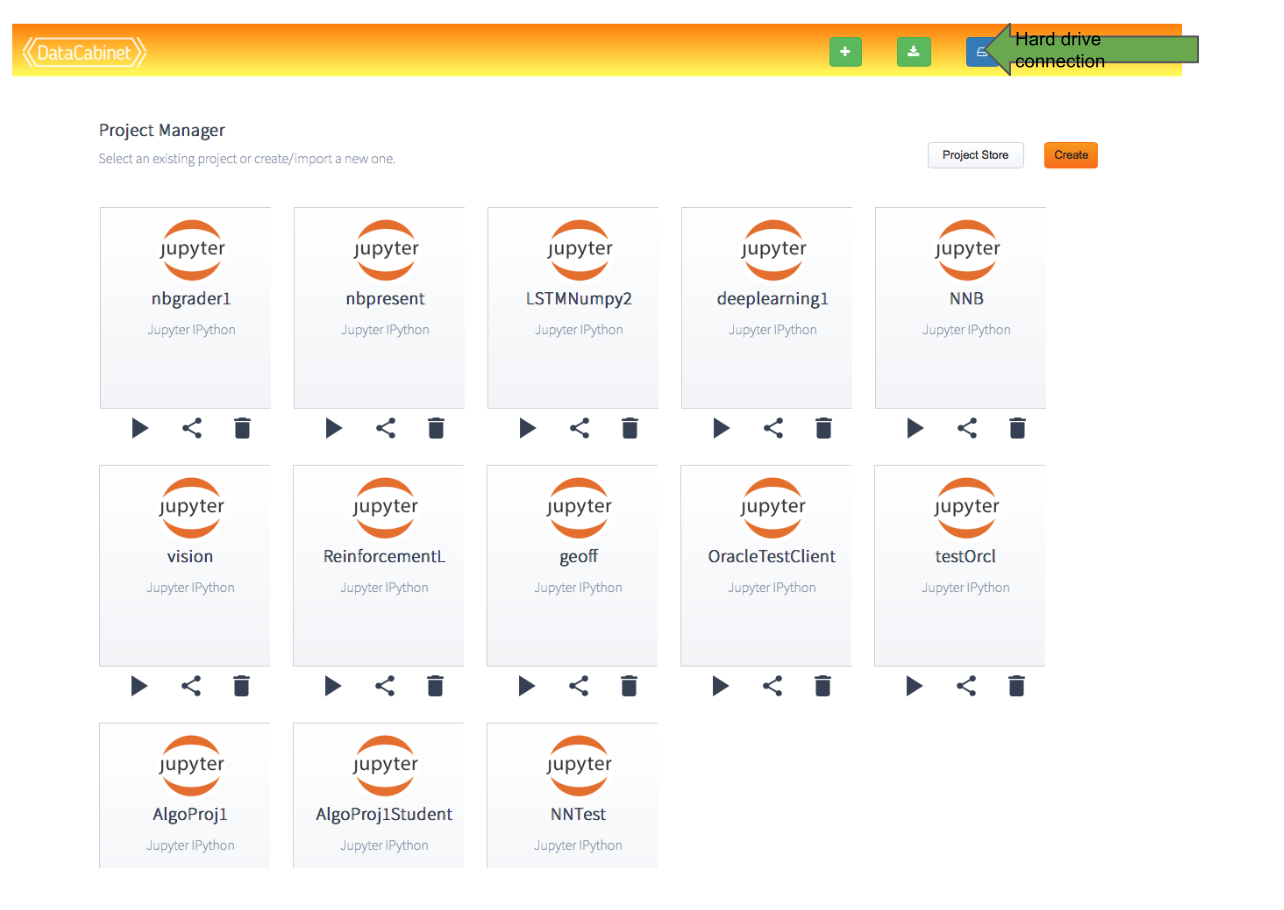
After login, your hard drive is not available if there is another session still running. You can force the hard drive to connect to your current session This button will remind you if you have another session going on: . It will disconnect the other session if you click it. When this button is green () - the hard drive is correctly attached to the current session.
You will need to enter an access code to be able to run Jupyter notebooks after your trial runs out.
Create project
A DataCabinet project comprises of a set of user code files and one conda environment. The conda environment can have package dependencies (like tensorflow or keras), notebook extensions (nbgrader, nbpresent), language kernels for notebooks etc.
To add a project, first you need to sign-in using your credentials or google account. You have to choose a Project Name and a password. Our environments also have a default Python version. You can choose the one you like. For other languages, you have to install the corresponding Jupyter kernel. Most of them are available as pypi or conda packages. See install packages for details.
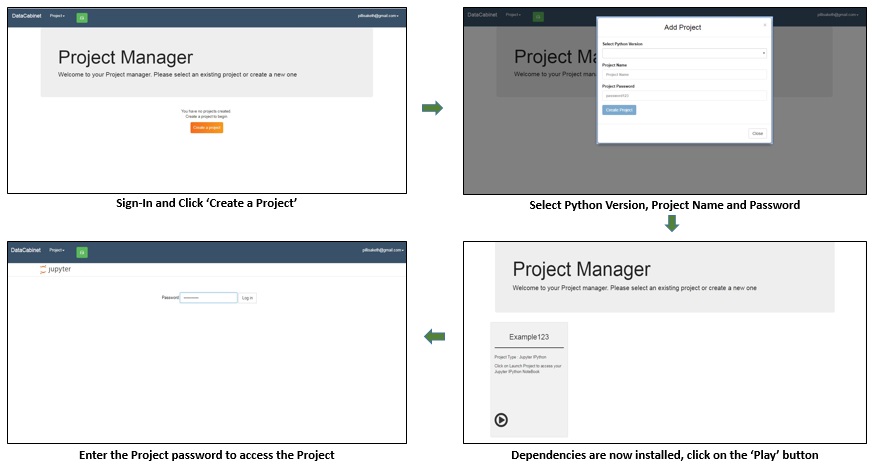
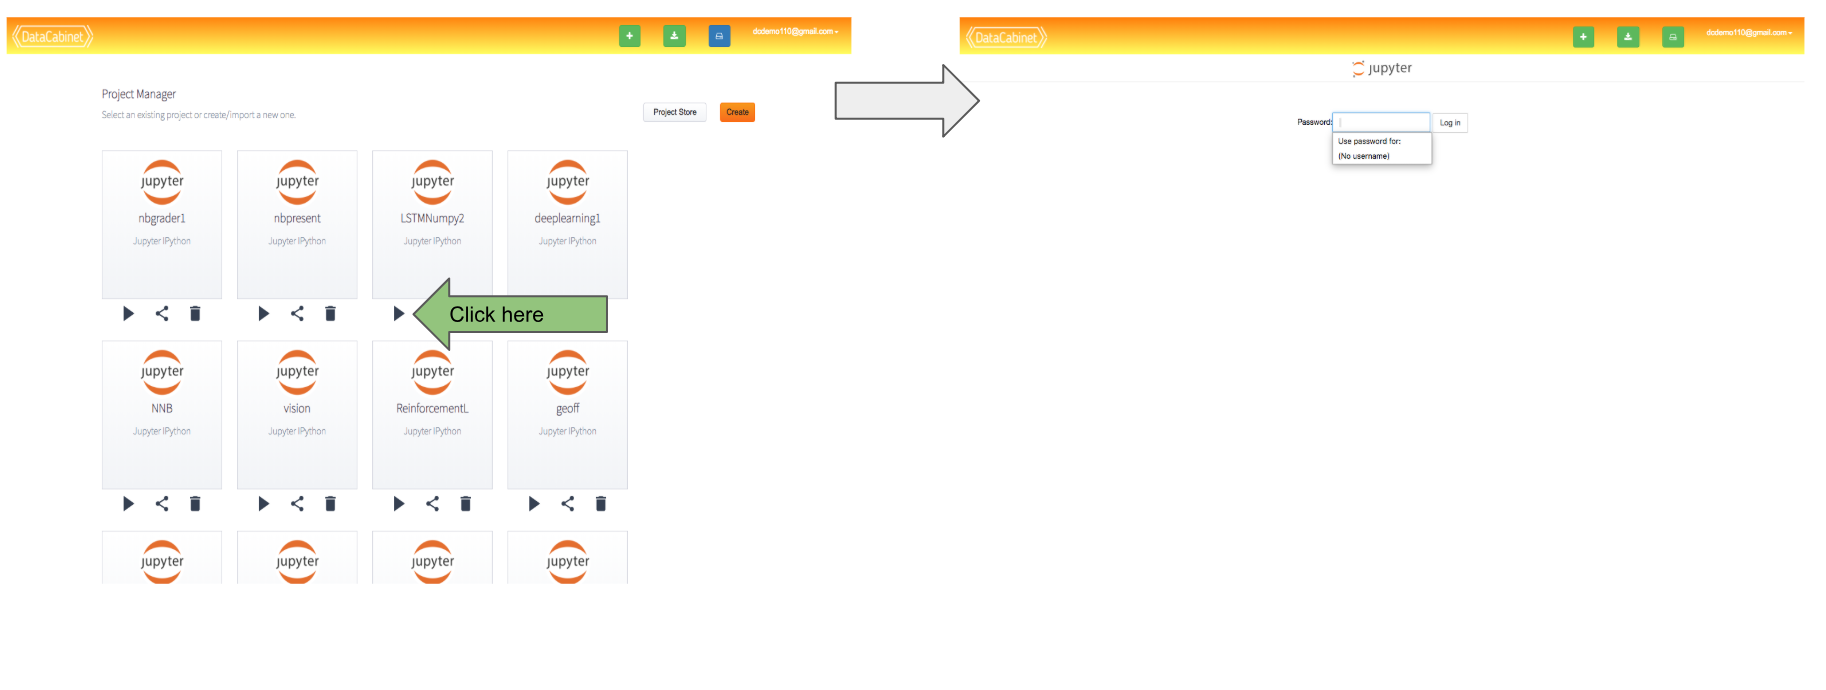
Launch project
Launching a notebook is easy. Just click the play button on project manager. It will prompt you for the password that was entered during project creation time(add or import).
Creating Notebooks
Using Jupyter you can create lots of interesting stuff: from simple notebooks to math-heavy presentations and autograded assignments. To get started with Jupyter go to Jupyter Notebook Basics.
You can also can install various language kernels and create notebooks in multiple languages.
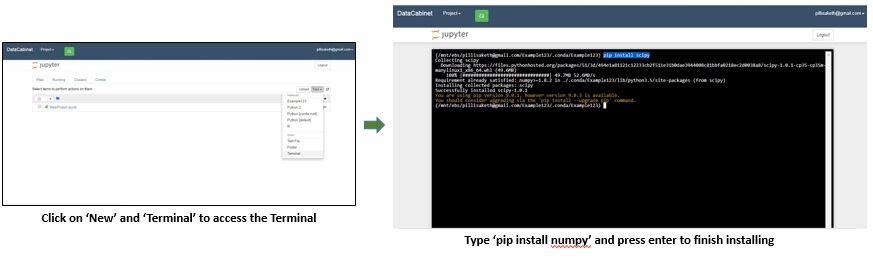
To create a notebook, on the Files tab, click the New button.
Install packages for environment
Every project you create in DataCabinet has a corresponding Conda environment with the same name as the project.
You can install additional packages for a project using either conda install packagename or pip install packagename.
In the Datacabinet platform, there are some installations that interfere with functioning and should not be pip installed(Jupyter, zmq etc). Sometimes these come as dependencies as well. For eg, the conda r-essentials package has Jupyter as a dependency. If somehow a wrong version of these packages is installed and Jupyter does not start, you may lose direct access to the project. It is a good idea to keep exporting your project at regular intervals so that you can retrieve the projects. Please write to us if you get into this situation and we can fix it. We are working on a way to fix it properly through versions.
Note: If you need to install pip packages from source, they cannot be exported. See Export Project on how to handle these.
A sample installation of a package numpy is highlighted below:
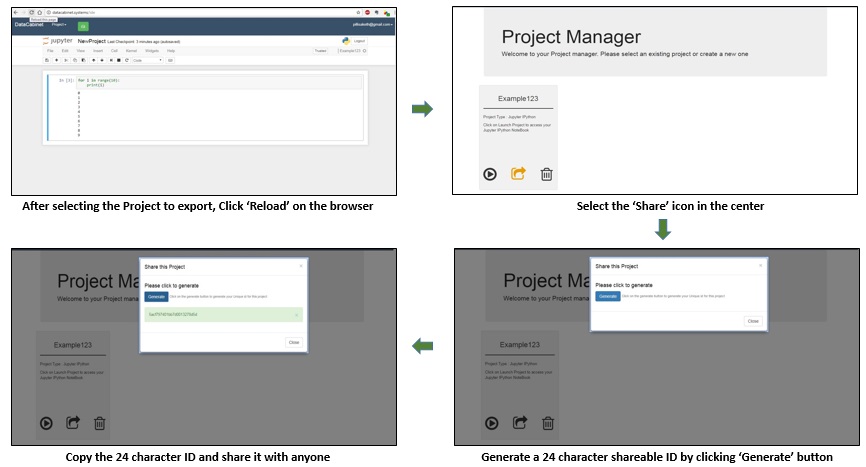
Export Project
Datacabinet allows you to export your project at any point. A common workflow of working on a project would be to create a project, write some code, install some packages and do some more initialization steps. At this point, we may want to export the package to share it with people. The export command is built for replicating the current state of your project to anyone.
For Python projects installed using pip from sources(using pip install -e
Also, please do not use any other conda channel than the default channel. It will not import properly.
Exporting a project exports the code(and other files) and the conda/pip packages. You can also write a script that can do further setup when a user imports the project. See more about this script in the import section.
Other users can import that project (using the share ID provided) and get a copy of the project exactly at the point the original user exported it.
You can share this ID with anyone, you want to share the project with.
To export a project, you need to login using your credentials or your google account. The next steps are mentioned below:
Import Project
Import project takes a project ID and does the following:
- Copies all the files
- Installs all packages
- IF there is a runnable file called import_init.sh in the base directory of the project, it runs that file.
There are two ways to import a project from someone else:
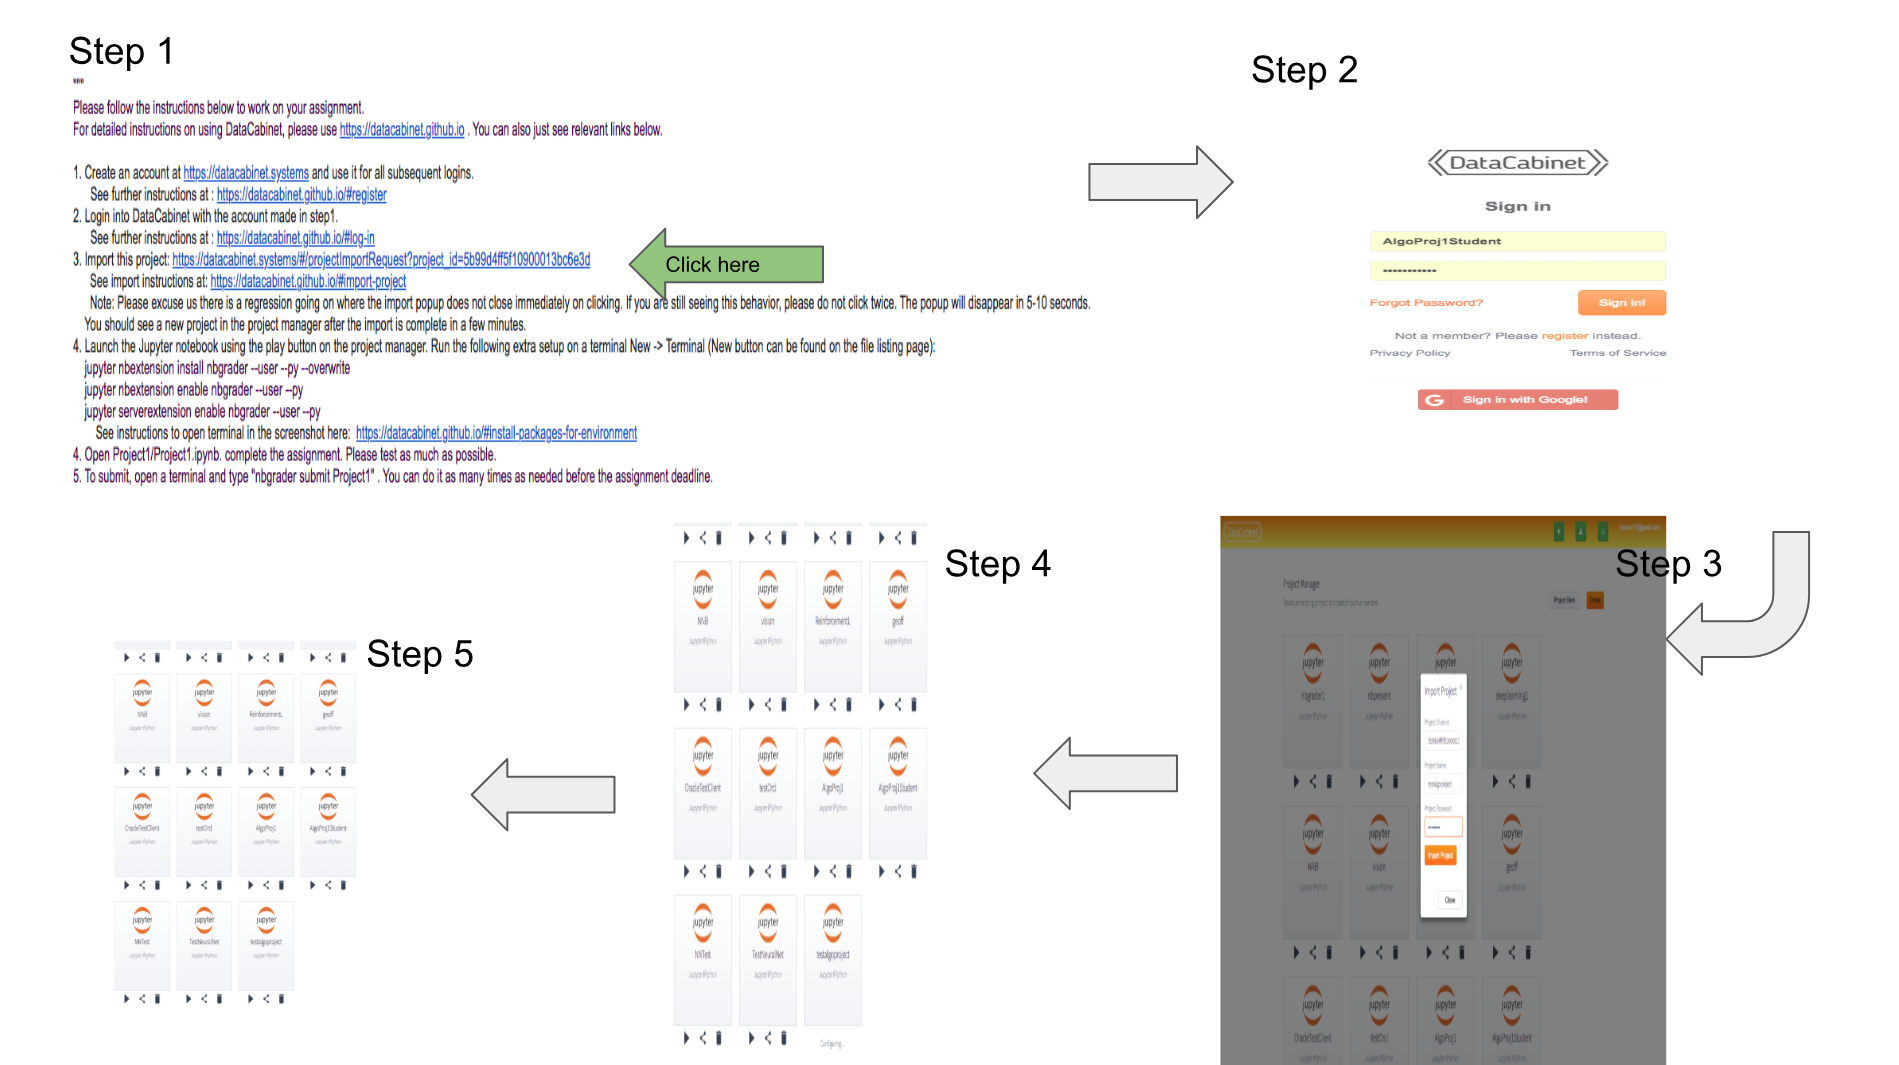
Method 1: Directly using the project id.
Get the id of the project from the sharer and use the import button. You will have to choose the name of the project and a password for the Jupyter notebook in Step 2. The import project button will be disabled until the hard drive is connected. There is a regression currently where after clicking the “Import Project” button, the dialiog closes but tile does not appear for 20 seconds. Importing twice will lead to error. Please wait after importing for 20 seconds.
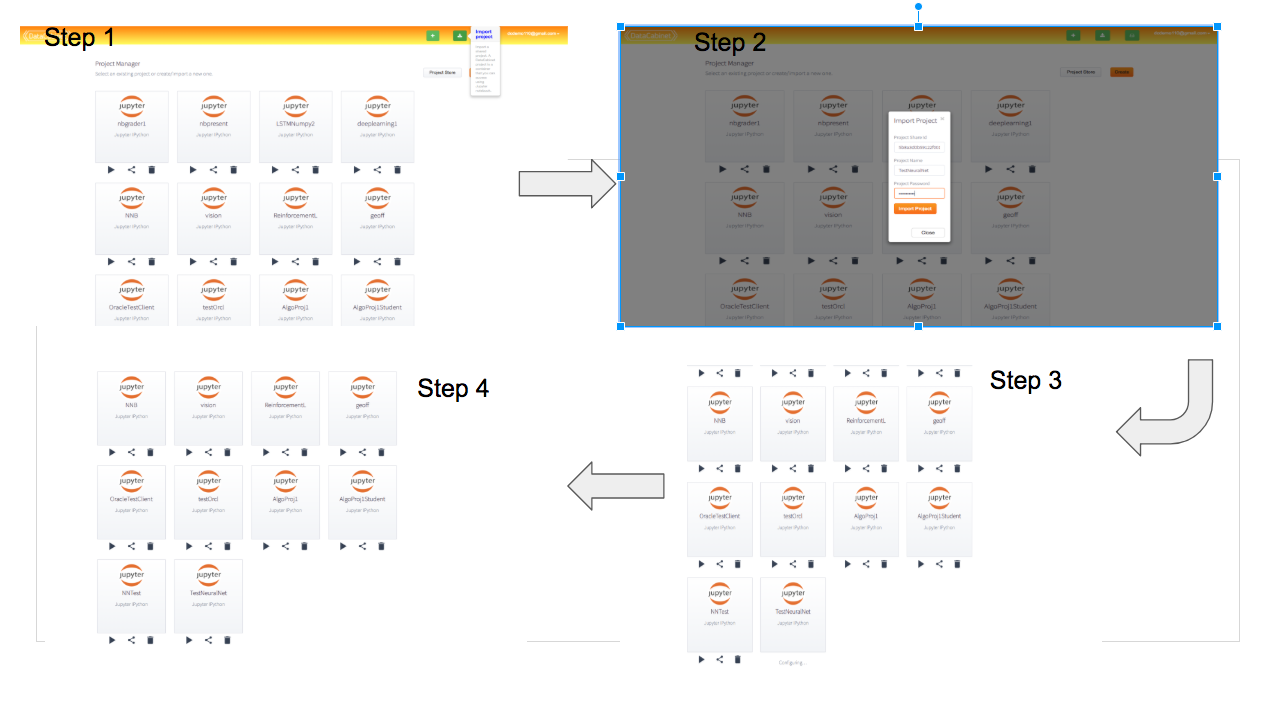
Method 2: Using a link
Get the link of the project from the sharer and use the import button. You will have to choose the name of the project and a password for the Jupyter notebook in Step 3. Step 2 will not be required if you are already logged in. The import project button will be disabled until the hard drive is connected. There is a regression currently where after clicking the “Import Project” button, the dialiog closes but tile does not appear for 20 seconds. Importing twice will lead to error. Please wait after importing for 20 seconds.
Code
When you finish writing code in the created file or just want to check current progress, just go to Cell > Run Cells. The result will be displayed in the new dialog.
DataCabinet provides you with the space on the NFS share (2GB) which allows you to publish your code using unix authorization mechanisms.
DataCabinet and NBGrader
DataCabinet provides you the backend to create and distribute programming assignments using nbgrader. You can create a populated assignment with both questions and answers and then nbgrader turns it into unpopulated version which contains only questions. Then you can share the assignments with students, auto grade and/or form grade assignment, and then distribute grades. Please find more documentation about nbgrader here: jupyter nbgrader
For instructor
Prerequisite: Install and configure nbgrader with DataCabinet:
-
Create and Open a new project.
-
Go to New > Terminal, and then install nbgrader. You need to type your own:
pip install nbgrader jupyter nbextension install --user --overwrite --py nbgrader jupyter nbextension enable --user --py nbgrader jupyter serverextension enable --user --py nbgrader -
You might need to restart notebook or log out/log in again to see the changes. To restart the notebook, you will have to either logout/login or start another project and switch back to the current project. We are working on fixing this.
-
On terminal, Run the following command to create an empty configuration file:
nbgrader --generate-config -
Make a directory in Terminal and give everyone permission to it:
mkdir /mnt/nfs/<your email>/share chmod 777 /mnt/nfs/<your email>/share -
Open the nbgrader_config.py file that is generated through the jupyter console and put:
 c = get_config()
 c.Exchange.course_id = "<Project name>"
 c.Exchange.root = "/mnt/nfs/<your email>/share"
 c.ExecutePreprocessor.kernel_name = “<Project name>”
Please be careful there should be no spaces before these lines. You will have to restart notebook for exchange root to be setup properly.
Create assignment (Original project):
-
Go to Formgrader > Add new assignment
-
Open the folder that you just created and create a notebook. Open the notebook.
-
Go to View > Cell Toolbar > Create Assignment.
-
Add cells with content:
-
Multiple cells with questions and tasks, each cell will have ID, points.
-
Solution in a solution block and student is expected to fill it up
-
Assessment for you to grade answers
-
-
Save using File > Save and Checkpoint
Release assignment:
Go to Formgrader > Click Generate > Click Release
After releasing, instructors will have to create a student version of the assignment(explained in the next section: Create student version)
Collect & Grade assignment:
-
Go to Formgrader > Click Collect
-
click the digits under Submissions
-
click the mark under Autograde and see the solutions.
Create student version
Repeat Step 1 to Step 4 on For Instructor -> Pre-Requisite . Choose a different project name silly.
Next, open the nbgrader_config.py file that is generated through the jupyter console and put:
    c = get_config()
    c.Exchange.course_id = "<Project name>"
    c.Exchange.root = "/mnt/nfs/<instructor email>/share"
Notice that <Project Name> is the course_id project created in the instructor version and instructor email is instructor’s email where the project was shared. WE can also install any other data or packages that are required to run the project at this point.
Next, we share this project using DataCabinet Project Manager’s share icon. That would give you the ID of the project. This ID can be shared with the student directly or as an http link: https://datacabinet.systems/#/projectImportRequest?project_id=<ID>
Integration with LMS
We provide integration with most popular lms system like Canvas, Blackboard, Moodle, Open EdEx. You can synchronize students’ assignments grades with any of these platforms.
Requirements
- Students’ e-mails on Nbgrader are identical with students’ e-mails on lms system
- Assignments names on Nbgrader are identical with assignments names on lms system
- You must be an course instructor on lms system
- You must have API access on lms system
Integration with Canvas
Getting api token
Go to your profile settings page and at the bottom click the button that says “New Access Token”. You can use this access token to synchronize grades with Nbgrader
Usage
Go to nbgrader home ‘/tree’ and open nbgrader_config.py. Type next strings:
  c.CourseDirectory.canvas_token = 'Your canvas api token'  # string
  c.CourseDirectory.canvas_account_id = 'Your canvas account id'  # string
  c.CourseDirectory.canvas_course_id = 'Your canvas course id'  # string
Then save the file. In Nbgrader assignments manager click synchronize button with assignment name near your assignment.
Integration with BlackBoard
Getting api token
Register new app on https://developer.blackboard.com then, contact with your blackboard portal administrator to accept your app
Usage
Go to nbgrader home ‘/tree’ and open nbgrader_config.py. Type the following strings:
  c.CourseDirectory.blackboard_app_key = 'Your BlackBoard app key'  # string
  c.CourseDirectory.blackboard_app_secret = 'Your BlackBoard app secret'  # string
  c.CourseDirectory.blackboard_learn_domain = 'Domain of BlackBoard your blackboard portal'  # for example 'http://my.blackboard.com'
  c.CourseDirectory.blackboard_course_id = 'Your BlackBoard course id'  # string
Then save the file. In Nbgrader assignment manager click synchronize button with assignment name near your assignment.
Integration with Moodle
Getting api token
Contact with your Moodle portal administrator to get access token
Usage
Go to nbgrader home ‘/tree’ and open nbgrader_config.py. Type the following strings:
  c.CourseDirectory.moodle_app_key = 'Your access Moodle torken'  # string
  c.CourseDirectory.moodle_domain = 'Your Moodle domain'  # for example 'http://mymoodle.com'
  c.CourseDirectory.moodle_course_id = 'Your Moodle course id'  # string
Then save the file. In Nbgrader assignment manager click synchronize button with assignment name near your assignment.
Integration with Open EdEx
Open EdEx requirements
- Edx-score-api (https://github.com/ExtensionEngine/edx-score-api) should be installed on Edx lms (ask your edx admin about this)
Getting api token
To request access to the edX Course Catalog API, you need a dedicated edx.org account with a user name that matches your organization’s identity. For example, if you are at an organization named Example, Inc., you need to create an edX account with a user name like Example. This enables edX to match your Course Catalog API request with an organization that is authorized to use the Course Catalog API.
To request access to the edX Course Catalog API, follow these steps.
-
Sign in to edX at https://courses.edx.org/login with an account whose user name matches your organization’s identity, as described in Create an Account on edx.org for API Access.
-
Go to http://courses.edx.org/api-admin.
-
On the EdX API Access Request page, enter the information for your organization. All fields are required.
Company Name: The name of your company. Website: The URL for your company’s website. Company Address: Your company’s mailing address. This can be a street address or a post office box. Application Description: A brief description of the main use for your application. -
At the bottom of the form, select the Terms of Service check box.
-
Select Request API Access to submit your request.
After you submit the request form, edX will review your request, and then edX will send you an email message approving your request or providing more information.
When you receive your approval email message from edX, follow these steps.
-
Go to http://your-edx-platform.com/api-admin/status.
-
On the page that opens, enter the following information.
Name: An identifying name that you assign to your application. Redirect URIs (optional): https://datacabinet.info -
Select Generate API client credentials.
The screen displays your application name, client ID, client secret, and any redirect URIs that you entered. Make sure that you record your client ID and client secret.
Usage
Go to nbgrader home ‘/tree’ and open nbgrader_config.py. Type next strings:
  c.CourseDirectory.edx_auth_username = 'edx username'
  c.CourseDirectory.edx_auth_password = 'edx password'
  c.CourseDirectory.edx_users_ids = {'honor@example.com': 6}  # You may put dict of edx students ids into the settings
  c.CourseDirectory.edx_app_key = 'Your app key'
  c.CourseDirectory.edx_app_secret = 'Your app secret'
  c.CourseDirectory.edx_courseid = 'your edx course id'  # for example 'course-v1:edX+DemoX+Demo_Course'
  c.CourseDirectory.edx_domain = 'http://your-edx-platform.com'
Then save it file. In Nbgrader assignment manager click synchronize button with assignment name near your assignment.
For Student Users
To access assignments, students needs to import a course with the ID generated in the previous step (or by clicking the link). After import, you have the run the project, open a terminal and enable nbgrader:
   jupyter nbextension install --user --overwrite --py nbgrader
   jupyter nbextension enable --user --py nbgrader
   jupyter serverextension enable --user --py nbgrader
To get assignment, you need to click “fetch” first in Assignents and open the assignment. After you finish the assignment, you just can click submit.
*Keep in mind that you may need to log out and in the account after you install nbgrader.
*When you create a new notebook, you have to choose the same name as the project’s name under “New”.
Examples
You can use DataCabinet to create a number of complex assignments with various dependencies. Python assignments were discussed above. We will go through some more types. Students can work on the assignments with almost zero setup.
-
DeepLearning
We built an example of Deep Learning with openai gym. We started with an empty project, added the required notebooks and installed the required packages. The open AI gym is a python package that cannot be imported from conda or pypi. It has to be built from sources. We need to do two things to make it work. First, we put “gym” in the .export_ignore file in the project so that we do not try to export it like a pyPI/conda package. Also, we put “cd gym && pip install -e .” in the import_init.sh file so that the gym package gets installed properly.
You can import it from here: Reinforcement Learning -
C++ with NBGrader
C++ is supported through a cling kernel. This also uses a source library to install the cling C++ kernel for Jupyter. cling is put into the .export_ignore file in the project. The import_init.sh file reinstalls the cling Jupyter kernel and also enables nbgrader which needs to be enabled before first usage.jupyter nbextension install --user --overwrite --py nbgrader jupyter nbextension enable --user --py nbgrader jupyter serverextension enable --user --py nbgrader cd /usr/share/cling_2018-09-13_ubuntu14/share/cling/Jupyter/kernel pip install . jupyter-kernelspec install cling-cpp17 --userYou can import it from here: C++ NBGrader example
Please note that this is a student version of the NBGrader assignment. The instructor version has a little bit extra setup in the nbgrader_config.py file.c.ExecutePreprocessor.kernel_name = "cling-cpp17" c.ClearSolutions.code_stub = { "R": "# your code here\nraise NotImplementedError", "python": "# your code here\nraise NotImplementedError", "C++": "/* your code here,\n If there are compile errors or uncaught exceptions, you may not get credit */ \n return 0;" } -
SQL with NBGrader
SQL and NBGrader are enabled by using the cx_Oracle library for interacting with Oracle databases and ipython-sql library to install sql magix instructions for Jupyter. You can directly write SQL into this library. Everything is natively available in pyPI so we do not require .export_ignore and import_init.sh files. If you need an Oracle account to play around with, please send us an email. You can import it from here: SQL NBGrader example This is the server version of the assignment.Please note that we are not using a dedicated kernel but just some magic so take SQL input. The NBGrader setup is exactly same as any Python assignment. Also, the Oracle SQL server may not be working forever in which case please point it to a working SQL server.
-
R with NBGrader
The R kernel is available with the r and r-essentials package available from conda. You can install NBGrader and use the R kernel. In the nbgrader_config.py file, use:c.ExecutePreprocessor.kernel_name = "ir" c.ClearSolutions.code_stub = { "R": "# your code here\nraise NotImplementedError", "python": "# your code here\nraise NotImplementedError", "C++": "/* your code here,\n If there are compile errors or uncaught exceptions, you may not get credit */ \n return 0;" }
Miscellaneous
NBPresent
Using DataCabinet, you can create presentations in the Jupyter notebook.
Jupyter notebook allows you to mix your presentations with runnable code, mathematical notation and latex symbols using MathJax.
Prerequisite: install the nbpresent extension. In the needed project, go to New > Terminal, and then execute command:
    pip install nbpresent
    jupyter nbextension install nbpresent --user --py --overwrite
    jupyter nbextension enable nbpresent --user --py
    jupyter serverextension enable nbpresent --user --py
Then go to the needed notebook. In the tool menu you have new buttons
 that allow creating and showing the presentation.
-
Open the needed project and notebook.
-
Go to View > Cell toolbar > Slideshow.
-
In the Slide type drop-down list, select Slide.
-
Go to Cell > Cell type, and select the needed option (Code, Markdown, and …) and enter content for your presentation.
Add as many slides as you need, using … (… button).
-
On the top menu, click the Edit presentation button.

-
On the right panel, click Slides/Present.

-
Remove any slides already present by clicking the -Slide a number of times.

-
Choose either Basic or RISE/reveal slide format. After choosing the format, press escape or press the notebook button to get back to the notebook.

-
Now you can use the present button to present.
-
Tip: To see the source of the slide during the presentation, double-click a slide. To go back, press Ctrl + Enter.
GitSsh
The default key resides in the directory /mnt/ebs/<email>/.ssh directory. If you put the public key on your git provider, you will be able to access git and ssh.
Common Problems
- My new projects do not take password
It is possible your conda cache is corrupted.
conda clean --index-cache